PYNQ-Z1 Setup Guide
Prerequisites for the Pynq-Z1
PYNQ-Z1 board
Computer with compatible browser (Supported Browsers)
Ethernet cable
Micro USB cable
Micro-SD card with preloaded image, or blank card (Minimum 8GB recommended)
Getting Started Video
You can watch the getting started video guide, or follow the instructions in Board Setup.
Board Setup
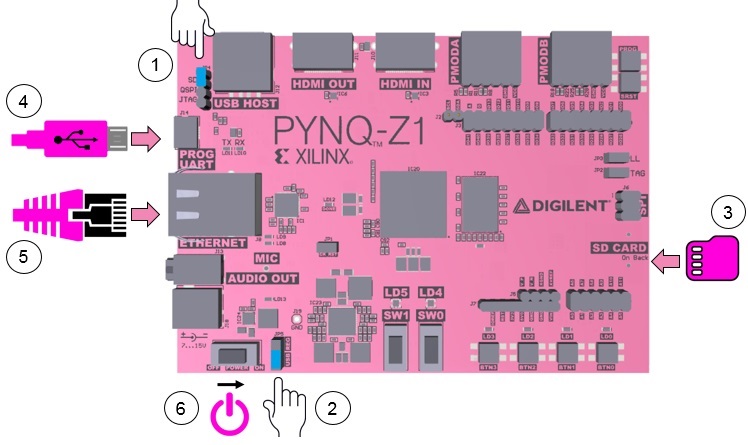
Set the JP4 / Boot jumper to the SD position by placing the jumper over the top two pins of JP4 as shown in the image. (This sets the board to boot from the Micro-SD card)
To power the PYNQ-Z1 from the micro USB cable, set the JP5 / Power jumper to the USB position. (You can also power the board from an external 12V power regulator by setting the jumper to REG.)
Insert the Micro SD card loaded with the PYNQ-Z1 image into the Micro SD card slot underneath the board.
Connect the USB cable to your PC/Laptop, and to the PROG - UART / J14 MicroUSB port on the board
Connect the board to Ethernet by following the instructions below
Turn on the PYNQ-Z1 and check the boot sequence by following the instructions below
Turning On the PYNQ-Z1
As indicated in step 6 of Board Setup, slide the power switch to the ON position to turn on the board. The Red LD13 LED will come on immediately to confirm that the board has power. After a few seconds, the Yellow/Green LD12 / Done LED will light up to show that the Zynq® device is operational.
After a minute you should see two Blue LD4 & LD5 LEDs and four Yellow/Green LD0-LD3 LEDs flash simultaneously. The Blue LD4-LD5 LEDs will then turn on and off while the Yellow/Green LD0-LD3 LEDs remain on. The system is now booted and ready for use.
Network connection
Once your board is setup, you need to connect to it to start using Jupyter notebook.
Ethernet
If available, you should connect your board to a network or router with Internet access. This will allow you to update your board and easily install new packages.
Connect to a Computer
You will need to have an Ethernet port available on your computer, and you will need to have permissions to configure your network interface. With a direct connection, you will be able to use PYNQ, but unless you can bridge the Ethernet connection to the board to an Internet connection on your computer, your board will not have Internet access. You will be unable to update or load new packages without Internet access.
Connect directly to a computer (Static IP):
Connect the board to your computer’s Ethernet port
Browse to http://192.168.2.99
Jump to the Connecting to Jupyter Notebook section.
Connect to a Network Router
If you connect to a router, or a network with a DHCP server, your board will automatically get an IP address. You must make sure you have permission to connect a device to your network, otherwise the board may not connect properly.
Connect to a Router/Network (DHCP):
Connect the Ethernet port on your board to a router/switch
Connect your computer to Ethernet or WiFi on the router/switch
Browse to http://<board IP address>
Jump to the Connecting to Jupyter Notebook section.
Optional: see Change the Hostname below
Optional: see Configure Proxy Settings below
Connecting to Jupyter Notebook
Once you have connected to your boarcd, you will be presented with a login screen. The username is xilinx and the password is also xilinx.
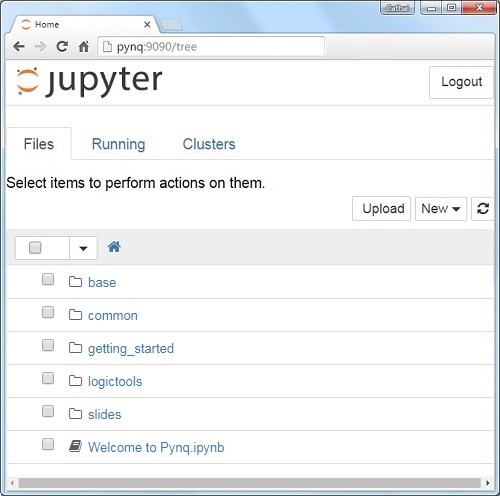
After logging in, you will see the following screen:
The default hostname is pynq and the default static IP address is 192.168.2.99. If you changed the static IP of the board, you will need to change the address you browse to.
The first time you connect, it may take a few seconds for your computer to resolve the hostname/IP address.
Example Notebooks
PYNQ uses the Jupyter Notebook environment to provide examples and documentation. Using your browser you can view and run the notebook documentation interactively.
The Getting_Started folder in the Jupyter home area includes some introductory Jupyter notebooks.
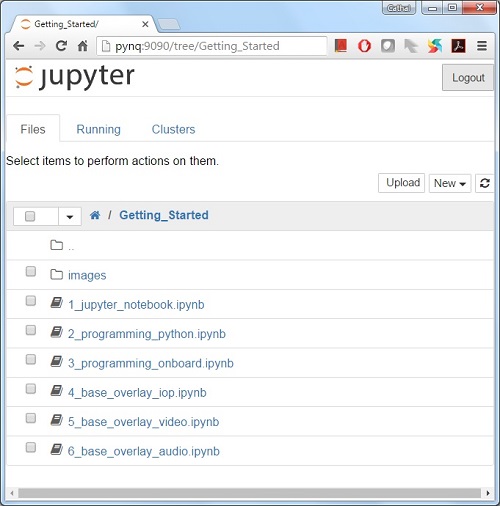
The example notebooks have been divided into categories
common: examples that are not overlay specific
Depending on your board, and the PYNQ image you are using, other folders may be available with examples related to Overlays. E.g. The base directory will have examples related to the base overlay. If you install any additional overlays, a folder with example notebooks will usually be copied here.
When you open a notebook and make any changes, or execute cells, the notebook document will be modified. It is recommended that you “Save a copy” when you open a new notebook. If you want to restore the original versions, you can download all the example notebooks from GitHub.
Configuring PYNQ
Accessing Files on The Board
Samba, a file sharing service, is running on the board. This allows you to access the Pynq home area as a network drive, to transfer files to and from the board.
Note
In the examples below change the hostname or IP address to match your board settings.
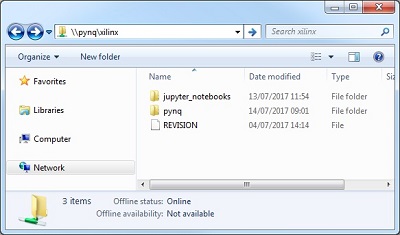
To access the Pynq home area in Windows Explorer type one of the following in the navigation bar.
\\192.168.2.99\xilinx # If connected to a Computer with a Static IP
When prompted, the username is xilinx and the password is xilinx. The following screen should appear:
To access the home area in Ubuntu, open a file broswer, click Go -> Enter Location and type one of the following in the box:
smb://192.168.2.99/xilinx # If connected to a Computer with a Static IP
When prompted, the username is xilinx and the password is xilinx
Change the Hostname
If you are on a network where other PYNQ boards may be connected, you should change your hostname immediately. This is a common requirement in a work or university environment. You can change the hostname from a terminal. You can use the USB cable to connect a terminal. A terminal is also available in the Jupyter environment and can be used from an internet browser.
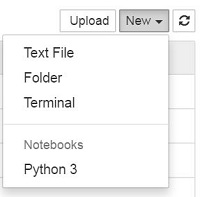
To access the Jupyter terminal, in the Jupyter portal home area, select New >> Terminal.
This will open a terminal inside the browser as root.
Use the preloaded pynq_hostname.sh script to change your board’s hostname.
pynq_hostname.sh <NEW HOSTNAME>
The board must be restarted for the changes to be applied.
shutdown -r now
Note that as you are logged in as root, sudo is not required. If you connect a terminal from the USB connection, you will be logged in as the xilinx user and sudo must be added to these commands.
When the board reboots, reconnect using the new hostname.
If you can’t connect to your board, see the step below to open a terminal using the micro USB cable.
Configure Proxy Settings
If your board is connected to a network that uses a proxy, you need to set the proxy variables on the board. Open a terminal as above and enter the following where you should replace “my_http_proxy:8080” and “my_https_proxy:8080” with your settings.
set http_proxy=my_http_proxy:8080
set https_proxy=my_https_proxy:8080
Troubleshooting
Opening a USB Serial Terminal
If you can’t access the terminal from Jupyter, you can connect the micro-USB cable from your computer to the board and open a terminal. You can use the terminal to check the network connection of the board. You will need to have terminal emulator software installed on your computer. PuTTY is one application that can be used, and is available for free on Windows. To open a terminal, you will need to know the COM port for the board.
On Windows, you can find this in the Windows Device Manager in the control panel.
Open the Device Manager, expand the Ports menu
Find the COM port for the USB Serial Port. e.g. COM5
Open PuTTY
Once PuTTY is open, enter the following settings:
Select serial
Enter the COM port number
Enter the serial terminal settings (below)
Click Open
Full terminal Settings:
115200 baud
8 data bits
1 stop bit
No Parity
No Flow Control
Hit Enter in the terminal window to make sure you can see the command prompt:
xilinx@pynq:/home/xilinx#
You can then run the same commands listed above to change the hostname, or configure a proxy.
You can also check the hostname of the board by running the hostname command:
hostname
You can also check the IP address of the board using ifconfig:
ifconfig
If you are having problems, please see the Troubleshooting section in Frequently Asked Questions (FAQs) or go the PYNQ support forum