ZCU104 Setup Guide
Prerequisites
- ZCU104 board
- Computer with compatible browser (Supported Browsers)
- USB WiFi dongle or Ethernet cable
- Micro USB cable (optional)
- Micro-SD card with preloaded image, or blank card (Minimum 8GB recommended)
Note
If you do not have a Mirco-SD card with a preloaded image, follow Writing a PYNQ image to an SD Card Image instructions.
Network connection
You will connect to your board using a network connection. There are three main options:
- Connect the board to your local WiFi network
- Wired connection from your board to your network
- Direct Ethernet connection from your board to your PC (no internet)
For the best experience with PYNQ, you should connect your board to a network with internet access (options 1 & 2). This will allow you to update your board and easily install new packages including PYNQ Overlays.
For WiFi (option 1) you need a supported USB WiFi Device. If you want to connect to WiFi follow the steps to Configure WiFi on your PYNQ image before you setup your board.
For option 2 or 3, connect your board to your computer’s Ethernet port or to your wired network with an Ethernet cable.
Getting Started Video
You can watch the getting started video guide, or follow the instructions in Board Setup.
Board Setup

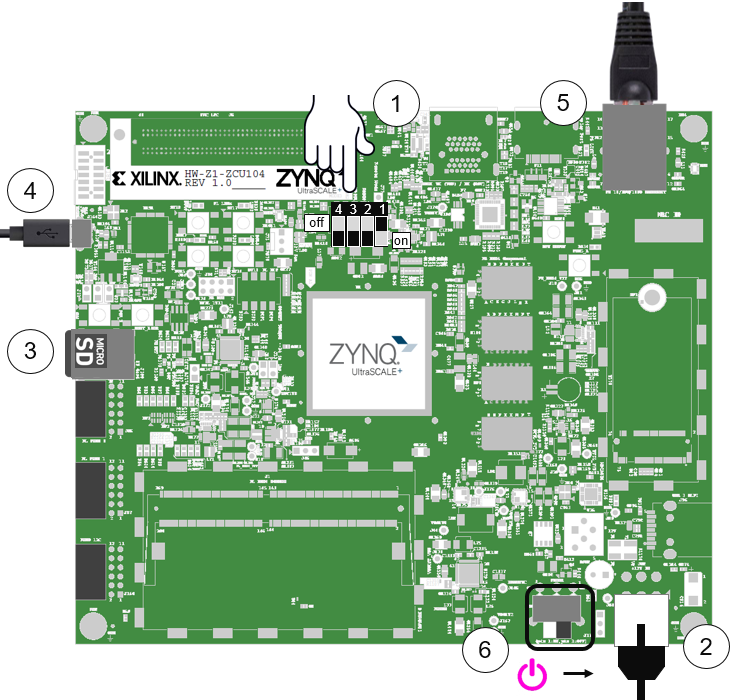
Set the Boot Dip Switches (SW6) to the following positions:
(This sets the board to boot from the Micro-SD card)
- Dip switch 1 (Mode 0): On (down position in diagram)
- Dip switch 2 (Mode 1): Off (up position in diagram)
- Dip switch 3 (Mode 2): Off (up)
- Dip switch 4 (Mode 3): Off (up)
Connect the 12V power cable. Note that the connector is keyed and can only be connected in one way.
Insert the Micro SD card loaded with the appropriate PYNQ image into the MicroSD card slot underneath the board
(Optional) Connect the USB cable to your PC/Laptop, and to the USB JTAG UART MicroUSB port on the board
Connect your USB Wifi Dongle or Ethernet cable by following the instructions below
Turn on the board and check the boot sequence by following the instructions below
Turning On the ZCU104
As indicated in step 6, slide the power switch to the ON position to turn on the board. A Red LED and some additional yellow board LEDs will come on to confirm that the board has power. After about a minute, the red LED will change to Yellow. This indicates that the bitstream has been downloaded and the system is booting.
Connect to your board
If you have not already done so, follow one of the steps below to setup your network connection to your board:
When your network connection is setup, conotinue to Connecting to Jupyter Notebook.